Configure your network settings to use Google Public DNS
Caution: We recommend that only users who are proficient with configuring operating system settings make these changes.
Important: Before you start
Before you change your DNS settings to use Google Public DNS, be sure to write down the current server addresses or settings on a piece of paper. It is very important that you keep these numbers for backup purposes, in case you need to revert to them at any time.
We also recommend that you print this page, in the event that you encounter a problem and need to refer to these instructions.
Google Public DNS IP addresses
The Google Public DNS IP addresses (IPv4) are as follows:
- 8.8.8.8
- 8.8.4.4
The Google Public DNS IPv6 addresses are as follows:
- 2001:4860:4860::8888
- 2001:4860:4860::8844
You can use either address as your primary or secondary DNS server.
Important: For the most reliable DNS service, configure at least two DNS addresses. Do not specify the same address as both primary and secondary.
You can configure Google Public DNS addresses for either IPv4 or IPv6 connections, or both. For IPv6-only networks with a NAT64 gateway using the 64:ff9b::/96 prefix, you can use Google Public DNS64 instead of Google Public DNS IPv6 addresses, providing connectivity to IPv4-only services without any other configuration.
( Please save your current IP address somewhere before you proceed. So that you can revert back the changes if needed. )
Change your DNS servers settings
Because the instructions differ between different versions/releases of each operating system, we only give one version as an example. If you need specific instructions for your operating system/version, please consult your vendor’s documentation. You may also find answers on our user group page.
Many systems let you to specify multiple DNS servers, to be contacted in priority order. In the following instructions, we provide steps to specify only the Google Public DNS servers as the primary and secondary servers, to ensure that your setup correctly uses Google Public DNS in all cases.
Windows
DNS settings are specified in the TCP/IP Properties window for the selected network connection.
Example: Changing DNS server settings on Windows 10
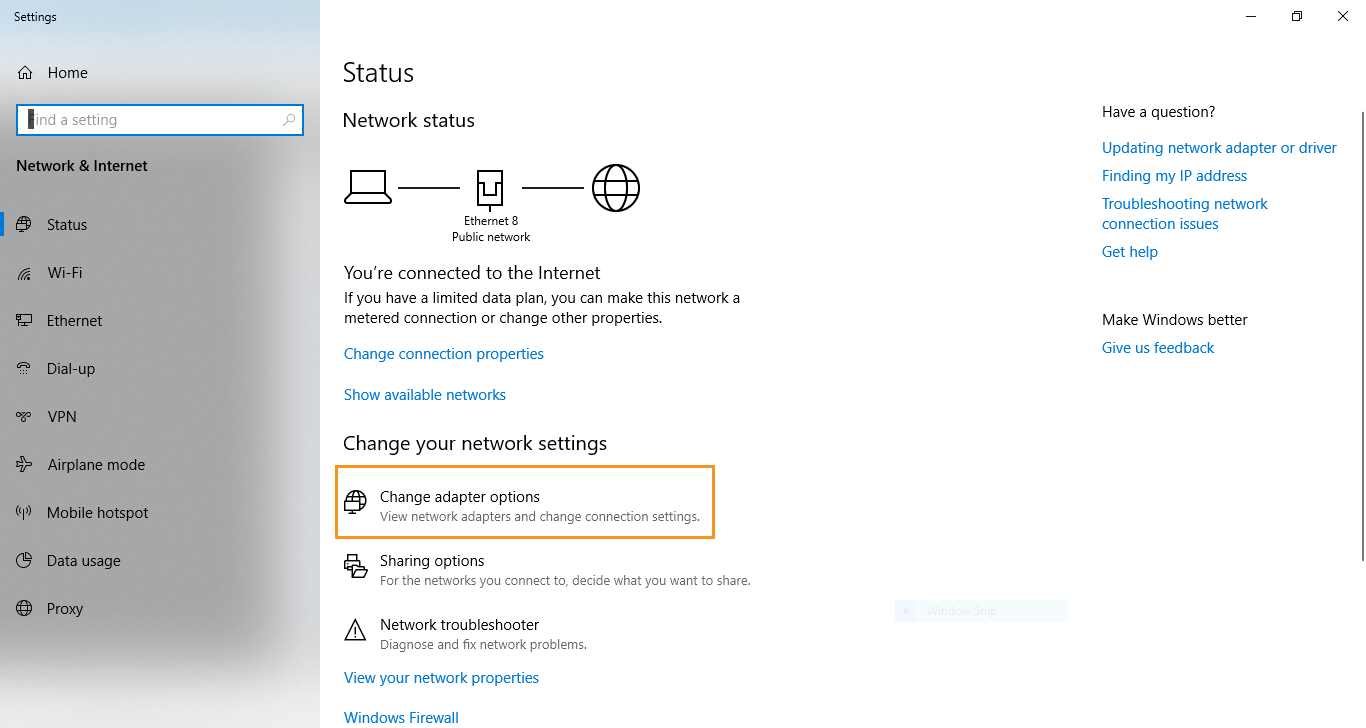
- Go to the Control Panel.
- Click Network and Internet > Network and Sharing Center > Change adapter settings.
3. Select the connection for which you want to configure Google Public DNS. For example:
- To change the settings for an Ethernet connection, right-click the Ethernet interface and select Properties.
- To change the settings for a wireless connection, right-click the Wi-Fi interface and select Properties.
If you are prompted for an administrator password or confirmation, type the password or provide confirmation.
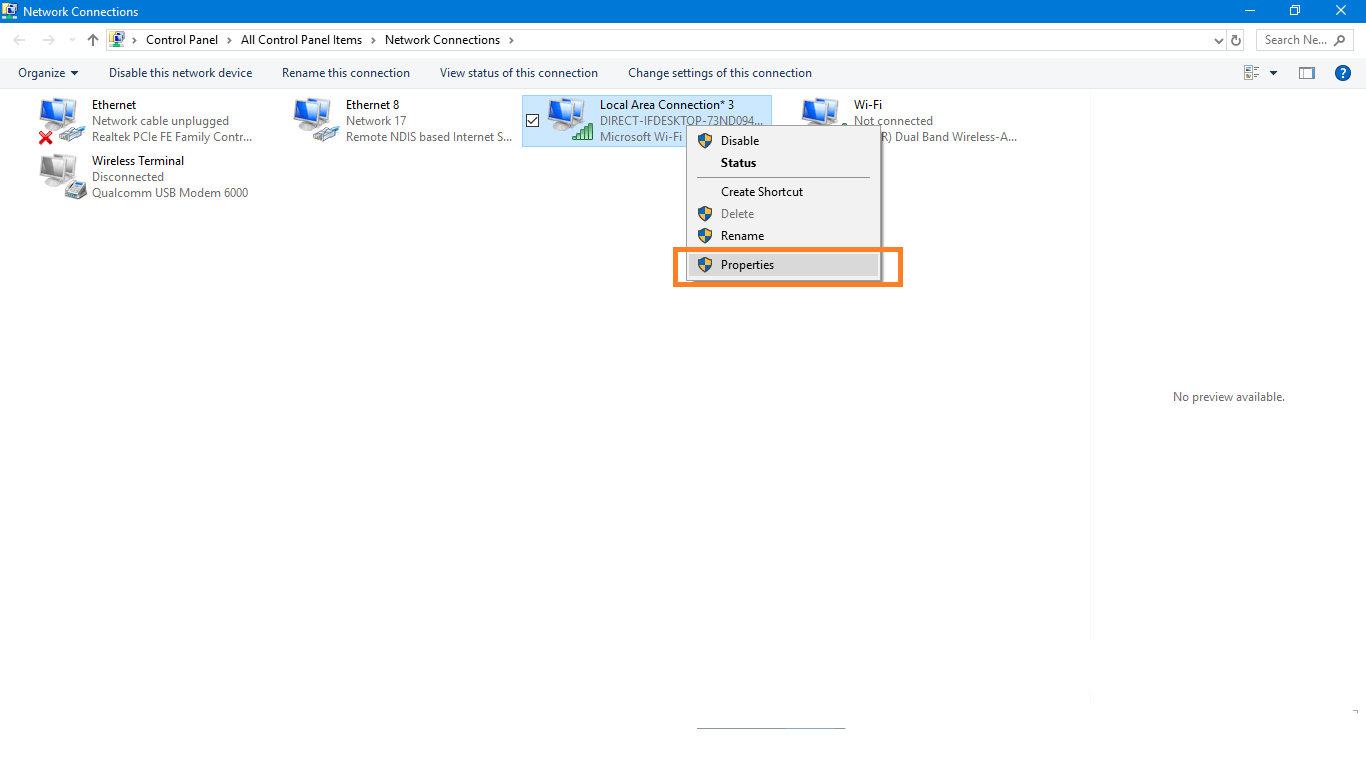
- Select the Networking tab. Under This connection uses the following items, select Internet Protocol Version 4 (TCP/IPv4) or Internet Protocol Version 6 (TCP/IPv6) and then click Properties.
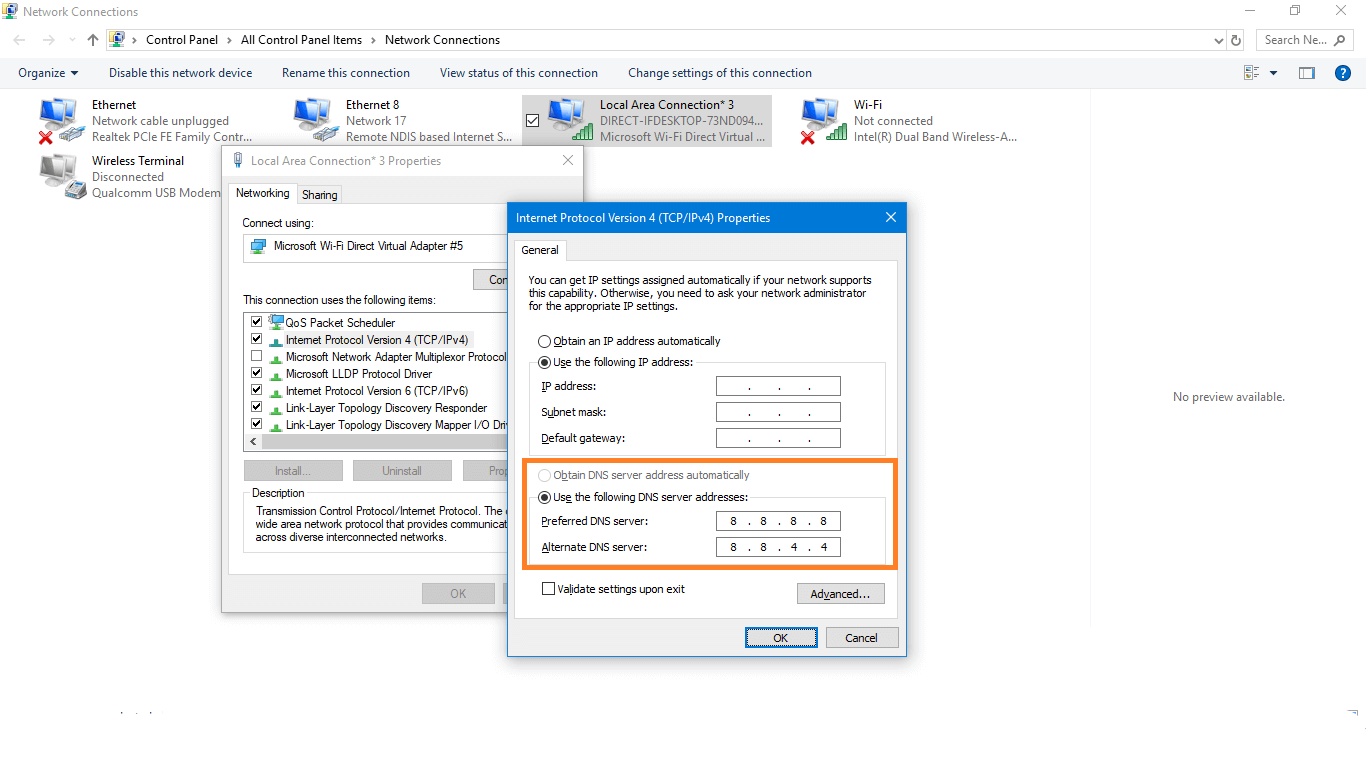
- Select Use the following DNS server addresses. If there are any IP addresses listed in the Preferred DNS server or Alternate DNS server, write them down for future reference.
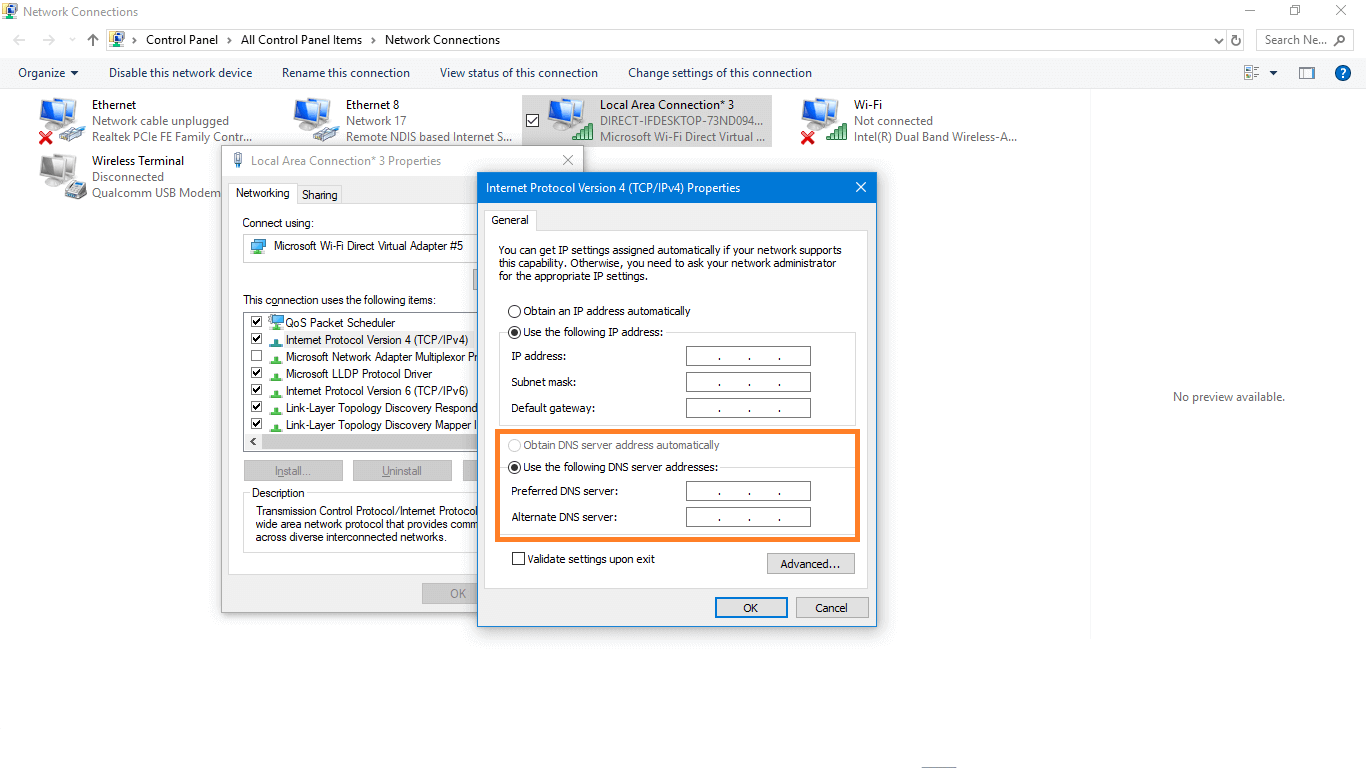
Replace those addresses with the IP addresses of the Google DNS servers:
- For IPv4: 8.8.8.8 and/or 8.8.4.4.
- For IPv6: 2001:4860:4860::8888 and/or 2001:4860:4860::8844.
- For IPv6-only: you can use Google Public DNS64 instead of the IPv6 addresses in the previous point.
- click OK
- Restart connection
- Test that your setup is working correctly.
Note: There is no support for DNS-over-TLS in the base OS. To use DNS-over-TLS requires setting up a proxy resolver that supports DNS-over-TLS. Due to the complexity of the setup we do not describe it here.
macOS
DNS settings are specified in the Network window. Example: Changing DNS server settings on macOS 10.15- Click Apple menu > System Preferences > Network.
- If the lock icon in the lower left-hand corner of the window is locked, click the icon to make changes, and when prompted to authenticate, enter your password.
- Select the connection for which you want to configure Google Public DNS. For example:
- To change the settings for a Wi-Fi connection, select Wi-Fi, and click Advanced.
- To change the settings for an Ethernet connection, select Built-In Ethernet, and click Advanced.
- Select the DNS tab.
- Click + to replace any listed addresses with, or add, the Google IP addresses at the top of the list:
- For IPv4: 8.8.8.8 and/or 8.8.4.4.
- For IPv6: 2001:4860:4860::8888 and/or 2001:4860:4860::8844.
- For IPv6-only: you can use Google Public DNS64 instead of the IPv6 addresses in the previous point.
- Click OK > Apply.
- Test that your setup is working correctly;
- Repeat the procedure for additional network connections you want to change.
Note: There is no support for DNS-over-TLS in the base OS. To use DNS-over-TLS requires setting up a proxy resolver that supports DNS-over-TLS. Due to the complexity of the setup, we do not describe it here.
Linux
In most modern Linux distributions, DNS settings are configured through Network Manager.
Example: Changing DNS server settings on Ubuntu
- Click System > Preferences > Network Connections.
- Select the connection for which you want to configure Google Public DNS. For example:
- To change the settings for an Ethernet connection, select the Wired tab, then select your network interface in the list. It is usually called
eth0. - To change the settings for a wireless connection, select the Wireless tab, then select the appropriate wireless network.
- To change the settings for an Ethernet connection, select the Wired tab, then select your network interface in the list. It is usually called
- Click Edit, and in the window that appears, select the IPv4 Settings or IPv6 Settings tab.
- If the selected method is Automatic (DHCP), open the dropdown and select Automatic (DHCP) addresses only instead. If the method is set to something else, do not change it.
- In the DNS servers field, enter the Google Public DNS IP addresses, separated by a comma:
- For IPv4: 8.8.8.8 and/or 8.8.4.4.
- For IPv6: 2001:4860:4860::8888 and/or 2001:4860:4860::8844.
- For IPv6-only: you can use Google Public DNS64 instead of the IPv6 addresses in the previous point.
- Click Apply to save the change. If you are prompted for a password or confirmation, type the password or provide confirmation.
- Test that your setup is working correctly.
- Repeat the procedure for additional network connections you want to change.
If your distribution doesn’t use Network Manager, your DNS settings are specified in /etc/resolv.conf.
Example: Changing DNS server settings on a Debian server
- Edit
/etc/resolv.conf:sudo vi /etc/resolv.conf - If any
nameserverlines appear, write down the IP addresses for future reference. - Replace the
nameserverlines with, or add, the following lines:For IPv4:
nameserver 8.8.8.8
nameserver 8.8.4.4
For IPv6:
nameserver 2001:4860:4860::8888
nameserver 2001:4860:4860::8844
For IPv6-only, you can use Google Pubic DNS64 instead of the above IPv6 addresses.
- Save and exit.
- Restart any Internet clients you are using.
- Test that your setup is working correctly.
Additionally, if you are using DHCP client software that overwrites the settings in /etc/resolv.conf, you need to configure the DHCP client by editing the client’s configuration file.
Example: Configuring DHCP client software on a Debian server
- Back up
/etc/resolv.conf:sudo cp /etc/resolv.conf /etc/resolv.conf.auto - Edit
/etc/dhcp/dhclient.conf
(or/etc/dhcp3/dhclient.conf): sudo vi /etc/dhcp*/dhclient.conf- If there is a line following
requestwith onlydomain-name-servers,remove that line. - If there is a line containing
domain-name-serverswith IP addresses, write down the IP addresses for future reference. - Replace that line with, or add, the following line:
For IPv4:
prepend domain-name-servers 8.8.8.8, 8.8.4.4;For IPv6:
prepend domain-name-servers 2001:4860:4860::8888, 2001:4860:4860::8844;For IPv6-only, you can use Google Public DNS64 instead of the above IPv6 addresses.
- Save and exit.
- Restart any Internet clients you are using.
- Test that your setup is working correctly.
Note: There is no support for DNS-over-TLS in the base OS. To use DNS-over-TLS requires setting up a proxy resolver that supports DNS-over-TLS. Due to the complexity of the setup, we do not describe it here.
Chrome OS
DNS settings are specified in the Network section of the Settings menu for the selected network connection. Example: Changing DNS server settings on Chrome OS 71- Open the Settings menu.
- In the Network section, select the connection for which you want to configure Google Public DNS. For example:
- To change the settings for an Ethernet connection, click on the Ethernet section.
- To change the settings for a wireless connection, click on the Wi-Fi section and select the appropriate network name.
- Changing the DNS settings for a mobile data connection established with Instant Tethering isn’t possible. For mobile Wi-Fi hotspots that are manually set up, however, you can change the DNS settings using the instructions for a wireless connection.
- Expand the Network section for the selected connection.
- In the Name servers section:
- For IPv4: Select the Google name servers button (or alternatively, select the Custom name servers button and enter 8.8.8.8 and 8.8.4.4).
- For IPv6: Select the Custom name servers button and enter 2001:4860:4860::8888 and/or 2001:4860:4860::8844.
- For IPv6-only: you can use Google Public DNS64 instead of the IPv6 addresses in the previous point.
- Click outside the Network section to apply the settings.
- Test that your setup is working correctly.
- Repeat the procedure for additional network connections you want to change.
Note: Linux Apps and Android Apps running on Chrome OS will use these DNS server settings by default, but they also have the ability to override the settings.
Router
Every router uses a different user interface for configuring DNS server settings; we provide only the generic procedure. For more information, please consult your router documentation. To change your settings on a router:- In your browser, enter the IP address of your router to view the router’s administration console. Most routers are manufactured to use a default address such as 192.168.0.1, 192.168.1.1, 192.168.2.1, or 192.168.1.100. If none of them work or it’s changed, try to find the default gateway address in the network settings panel of your system.
- When prompted, enter the password to edit network settings.
- Find the screen in which DNS server settings are specified.
- If there are IP addresses specified in the fields for the primary and seconday DNS servers, write them down for future reference.
- Replace those addresses with the Google IP addresses:
- For IPv4: 8.8.8.8 and/or 8.8.4.4.
- For IPv6: 2001:4860:4860::8888 and/or 2001:4860:4860::8844.
- For IPv6-only: you can use Google Public DNS64 instead of the IPv6 addresses in the previous point.
- Save and exit.
- Restart your browser.
- Test that your setup is working correctly.
:: IPv6 abbreviation syntax. For such fields enter:
- 2001:4860:4860:0:0:0:0:8888
- 2001:4860:4860:0:0:0:0:8844
0 entries to 0000 if four hex digits are required. Note: Linux Apps and Android Apps running on Chrome OS will use these DNS server settings by default, but they also have the ability to override the settings.
iOS
You can change DNS settings on iPhone, iPad, or iPod touch with the following steps.
- Go to Settings > Wi-Fi.
- Tap the ⓘ icon next to the Wi-Fi network that you want to change DNS servers for. Scroll down to find the DNS section and tap Configure DNS.
- Tap Manual and add Google IP addresses. Optionally you can also remove all default DNS servers in the list.
- For IPv4: 8.8.8.8 and/or 8.8.4.4
- For IPv6: 2001:4860:4860::8888 and/or 2001:4860:4860::8844
Switching back to Automatic will restore the DNS server specified by the Wi-Fi network.
Note: this change only applies to a specific Wi-Fi network but not to other networks in the Wi-Fi list or DNS settings for cellular data. If you want all your Wi-Fi networks to use the same DNS configuration, the best option is to update the DNS configuration on your routers. To change the DNS for your iOS device on all networks including cellular data requires a VPN app that lets you to configure the DNS server for the VPN. Given that there are so many choices of VPN app and the setup complexity, it is only recommended for advanced users.
Android
Android 9 (Pie) or higher
Android 9 supports “Private DNS” which uses DNS-over-TLS to provide security and privacy for your DNS queries. You can configure it with the following steps.
- Go to Settings > Network & Internet > Advanced > Private DNS.
- Select Private DNS provider hostname.
- Enter
dns.googleas the hostname of the DNS provider. - Click Save.
Caution: Android 9 only! These Private DNS settings have no effect when you use a VPN like Nexus/Pixel Wifi-Assistant or Google Fi Nework VPNs, or third-party VPN or DNS Changerapps. Those features and apps override Private DNS and do not send DNS-over TLS queries to Google Public DNS. Most DNS changers send cleartext queries (a few like Intra use other secure DNS protocols) and VPN apps may not secure queries beyond the VPN server. This is fixed in Android 10.
Older Android versions
Devices running versions older than Android 9 do not support DNS-over-TLS and cannot configure private DNS for all networks. You can configure DNS for each individual Wi-Fi network you use. This requires configuring all network information manually and is only recommended for advanced users.
Mobile or other devices
DNS servers are typically specified under advanced Wi-Fi settings. However, as every mobile device uses a different user interface for configuring DNS server settings, we provide only the generic procedure. For more information, please consult your mobile provider’s documentation.
To change your settings on a mobile device:
- Go to the screen in which Wi-Fi settings are specified.
- Find the screen in which DNS server settings are specified.
- If there are IP addresses specified in the fields for the primary and secondary DNS servers, write them down for future reference.
- Replace those addresses with the Google IP addresses:
- For IPv4: 8.8.8.8 and/or 8.8.4.4.
- For IPv6: 2001:4860:4860::8888 and/or 2001:4860:4860::8844.
- For IPv6-only: you can use Google Public DNS64 instead of the IPv6 addresses in the previous point.
- Save and exit.
- Test that your setup is working correctly
Switch back to your old DNS settings
If you had not previously configured any customized DNS servers, to switch back to your old settings, in the window in which you specified the Google IP addresses, select the option to enable obtaining DNS server addresses automatically, and/or delete the Google IP addresses. This reverts your settings to using your ISP’s default servers.
If you need to manually specify any addresses, use the procedures above to specify the old IP addresses.
Restart your system if necessary.
Share:
More Posts

7 Best Tips to Hire Web Developer in India
7 Best Tips to Hire Web Developer in India A web developer will assist you to many important tasks that you may not be able

Stuck with the Net4india Domain? We Can Help You
Stuck with the Net4india Domain? We Can Help You Net4india was one of India’s most notable area recorders and web facilitating organizations. In the course

Effective 7 Steps For An Social Media Marketing Plan
Effective 7 Steps For An Social Media Marketing Plan Social media is a vital marketing channel for businesses of all sizes. The common question a
20 Different Types of Websites Part 2
20 Different Types of Websites Part 2 In this first part, 20 Different Types of Websites Part 1 we explored ten types of website, focusing